TopeLeave about Dec 1
← Shower build

Custom parts

Shower and both doors17 parts

Every part nobody sells in the right shape, designed as code: STL for the printer, STEP for SendCutSend.

  1. Measure the real hardware with calipers first. Anything marked ASSUMED waits for that.
  2. Print it in PETG and test the fit. Plastic proves fit, not strength.
  3. Metal parts: upload the STEP to SendCutSend, which unfolds bends and quotes on the spot. Their upload checks the bend and hole rules again.
  4. Anything that carries load (the D2 track plate) gets an hour of a mechanical engineer's time before ordering.

D2, the cab slider

designedd2-pull

Flush finger pull

D2 cab slider, both faces

Made by
print
Material
ASA (sun near the cab windows) or PETG
Waiting on
none: start now

A round flush pull that presses into a 1 3/8 in Forstner hole, one on each face of the 3/4 in leaf, back to back. Each cup is 5/16 deep so two leave 1/8 in of wood between them. Eight tiny crush ribs make the press fit; a drop of CA glue makes it permanent. Print flange down, no supports, 0.12 mm layers for a smooth dish.

  • ✗ two cups leave at least 0.1 in of wood between them
designed, ASSUMED sectiond2-track-cover

Track cover

D2 cab slider, over the Husky track

Made by
SendCutSend: laser cut and bent
Material
5052-H32 aluminium 0.063, black powder coat
Waiting on
the delivered track's cross-section (ASSUMED 1 1/8 x 1 3/16)

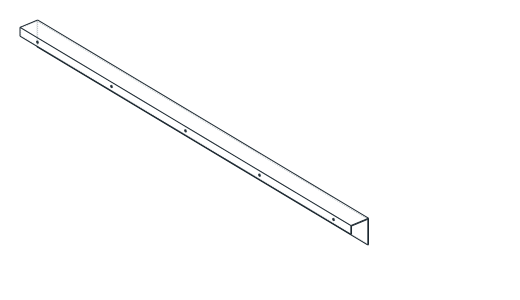
A removable bent channel that hides the track and the hangers: a back flange that screws to the structural head, a top that clears the track, and a front that hangs down over the hangers. Screws every 8 in through the back flange (#8, 0.17 holes). Lifting it off is two minutes with a screwdriver, which is how the track stays serviceable. Order the STEP (SendCutSend unfolds it); one piece, 38 in long.

  • ✓ every flange is longer than SendCutSend's minimum for this sheet
  • ✓ holes are at least the sheet thickness
  • ✓ holes sit far enough from the bend not to distort
  • ✓ the top clears the track
  • ✓ the front hangs past the track and the hanger bodies
plannedd2-track-plate

Track backing plate

D2 cab slider, behind the track

Made by
SendCutSend: laser cut, PEM nuts inserted
Material
304 stainless 0.090 or 3/16 5052
Waiting on
Husky track in hand (hole pattern, screw size); structural head measured; ENGINEER REVIEW, it carries the door
plannedd2-latches

Travel latches, closed and parked

D2 cab slider

Made by
print (prototype), then ASA or machined
Material
PETG prototype; ASA or stainless pin final
Waiting on
the bench mockup with the real track
plannedd2-bg1-bracket

BG1 guide bracket

D2 infill, at the doorway edge

Made by
SendCutSend: cut and bent
Material
304 stainless 0.090
Waiting on
BG1 guide in hand

D1, the kitchen door

plannedd1-stops

Strike stop and head stop

D1 kitchen door, kitchen face

Made by
stock: cut and drill (no order)
Material
black anodised 1/2 x 1/2 aluminium angle, already bought (Wholesale Glass 189513)
Waiting on
the D1 mockup proves the stop projection and gasket
plannedd1-latch-plate

Latch backing plate

D1, behind the partition

Made by
SendCutSend: laser cut, PEM nuts
Material
304 stainless 0.090
Waiting on
latch chosen (Southco M1-63 candidate)
plannedd1-hinge-jig

Hinge drilling jig

D1, for the blank Guden hinge

Made by
print
Material
PETG
Waiting on
the hinge in hand (leaf width, pin, gauge)
plannedd1-open-bumper

Open-stop bumper

D1, where it stops at about 78 degrees

Made by
print
Material
TPU (back spool holder, not the AMS)
Waiting on
the D1 mockup sets the angle

The shower

designed, ASSUMED fan sizesh-fan-cover

VETUS fan cover

Shower, cab wall, over the VETUS FAN12
Made by
print
Material
black ASA (wet and warm); PETG to test the fit
Waiting on
the fan in hand: its housing diameter and how far it stands off the wall (ASSUMED 130 mm and 60 mm)

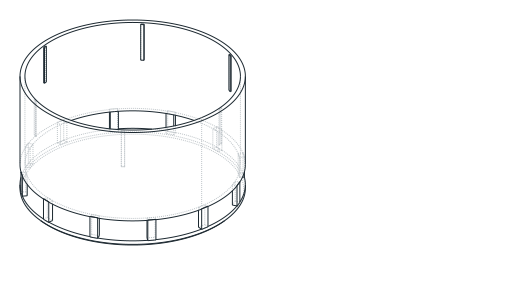
A black disc floating off a black ring, over the white VETUS. The front is solid, so spray from the handheld runs off it (the fan is sold as not waterproof). The air goes in through the shadow gap between the disc and the ring, right in front of the fan's own grille. The ring slips over the fan housing and six small ribs grip it: no screws through the wedi, and it pulls off to clean the fan. Print it front down in black ASA, no supports (the ring bridges between twelve posts). Set the fan's own switch to high and let the QuinLED channel run it.

  • ✓ the shadow gap (52 cm2) is more open than the fan's 3 in throat (45 cm2)
  • ✓ the ring bridges 29 mm between posts: printable without supports
  • ✓ the ribs are proud of the fit gap, so they grip
  • ✓ it sits inside the 7 in blocking ring
designed, measured spigotsh-fan-collar

VETUS fan collar

Shower, cab wall: between the cowl's spigot and the FAN12
Made by
print
Material
PETG (the black spool) or ASA
Waiting on
none: the cowl spigot is callipered (75.5 OD)

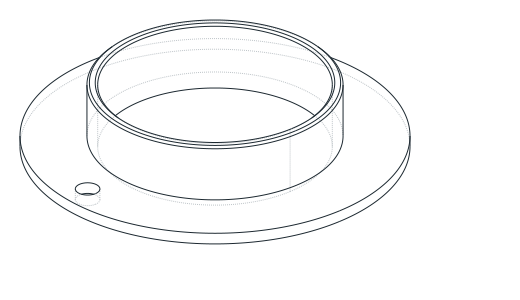
A flat black ring that sits on the wedi under the white fan, with a short tube on its back that slides over the end of the cowl's spigot inside the wall. It makes one sealed duct from the fan to the cowl, so the shower's damp air can't leak into the wall, and it covers the cut edge of the hole. Trim the spigot flush with the wedi face, bed the collar's tube on the spigot and in the hole with wedi Joint Sealant, then screw the fan on with three #6 x 2 through its screw posts (25 mm deep), drilling through the flange using the fan as the template. The small hole in the flange is for the fan's two wires, which leave through its open back: turn the collar so it misses the screw posts, and drill a matching hole in the wall. Print flange down, 4 walls, 40% gyroid, PETG 245 C, bed 70 C, no supports. About 2 hours.

  • ✓ 4.3 mm a side in the 3 5/8 hole for sealant
  • ✓ slides over the 75.5 spigot with 0.45 mm a side
  • ✓ the tube wall is 3 mm or more
  • ✓ the flange covers the hole with 15 mm or more all round
  • ✓ the flange hides inside the fan's white cup
  • ✓ the wall's wire hole stays 3 mm or more clear of the 3 5/8 hole
  • ✓ the wire hole sits between the tube and the fan's rim
  • ✓ fits the P1S bed (127 x 127 mm)
designed, measured spigot and fan cupsh-fan-collar-test

VETUS fan collar, test ring

Shower: test-fit only, before printing sh-fan-collar
Made by
print
Material
PETG, any colour
Waiting on
none

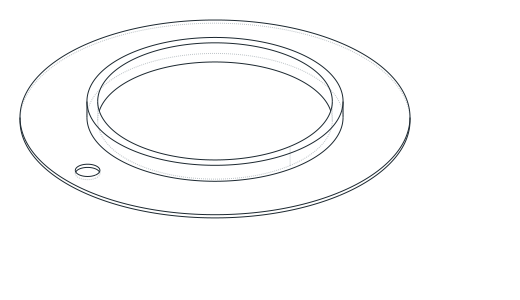
A thin slice of the collar: the full flange at 1.2 mm with the wire hole, and 6 mm of the tube. About 15 minutes. Check three things before printing the real collar: it slides over the cowl's tube (snug, a little play); the flange disappears inside the fan's white cup; and turned so the wire hole misses the fan's three screw posts, the posts still land on the flange. Then throw it away.

  • ✓ same flange as the collar (127.0 mm)
  • ✓ thin: 7.2 mm tall, a quick print
plannedsh-mixer-template

Mixer drilling template

Shower, driver wall

Made by
print
Material
PETG
Waiting on
the Scandvik 14140 in hand
plannedsh-shelf

Shelf, hooks, squeegee holder

Shower walls

Made by
SendCutSend or print
Material
304 stainless 0.060, or ASA
Waiting on
where they go (after the walls are planned)
plannedsh-cable-cover

Cable box cover, stainless

Shower, cab wall by corner A

Made by
SendCutSend: cut and bent
Material
304 stainless
Waiting on
HOLD: needs wedi's written OK to terminate on stainless instead of the plywood box
Grey water

designedgrey-floor-collar

Sink drop collar

Grey water, the kitchen drop at the cabinet floor

Made by
print, two of this half
Material
PETG
Waiting on
none: start now (sized for a cabinet hole up to 2 1/2 in)

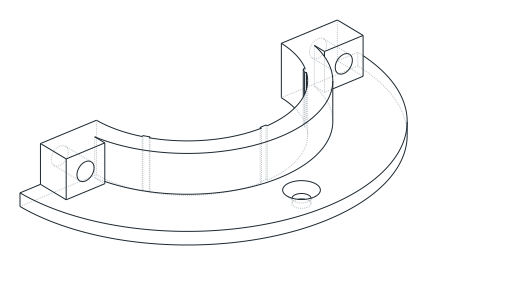
Two halves clamp round the 1 1/2 in PVC drop and sit flat on the cabinet floor. The pipe is unglued, so this is what holds it up off the Fernco, keeps it centred in the hole and covers the gap round it. Print the half twice, flange down, no supports. Clamp the halves with two #8-32 x 3/4 (or M4 x 20) screws and nuts through the ears, then, if you want it fixed, one #6 x 1/2 flat-head wood screw down through each flange. It comes off with a screwdriver, so the drop stays serviceable. Three small ribs inside bite on the pipe; tighten until they grip.

  • ✓ the ribs grip the pipe
  • ✓ the flange laps at least 0.4 in past a 2 1/2 in hole
  • ✓ the floor screws land on wood, outside the hole
  • ✓ the screws sit inside the flange edge
  • ✓ the ear holes fit within the hub height
  • ✓ a 3/4 in screw passes both ears with thread for the nut